Arranging Clips
Drag clips onto tracks, then move, trim, split, duplicate, fade, and crossfade them — direct manipulation with snapping and one undo step per gesture.
Building an arrangement feels like a DAW playlist: drag content onto a track, then move it, trim it, fade it, and overlap it into a crossfade. Every operation is direct, previewed while you drag.
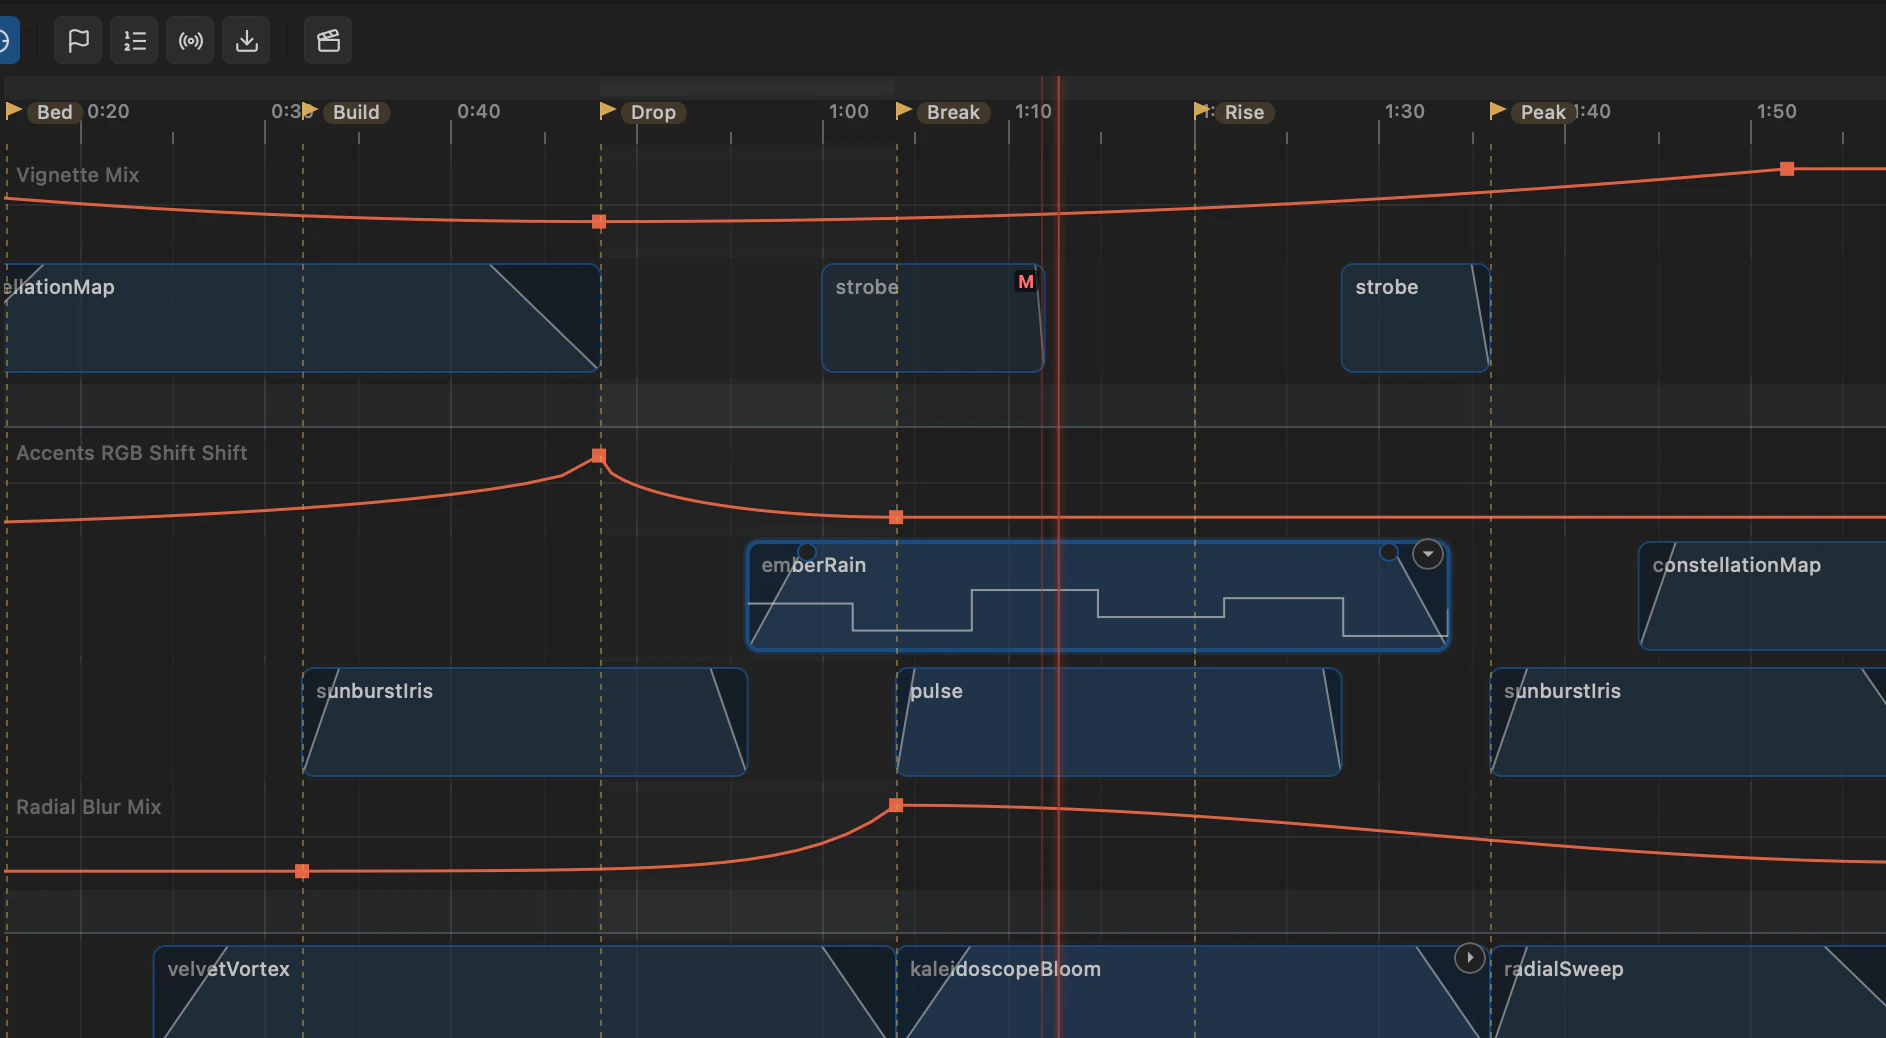
Getting content onto a track
Clips come from the same places they do in the grid — the library drawer, the Session grid itself, and your OS file browser:
| Drag from | Onto | Result |
|---|---|---|
| Library (animation, video, still, external) | A visual track | Places a clip under the cursor, snapped. |
| Library Files tab or Finder / Explorer (audio) | An audio track, or the empty area below the tracks | Places an audio clip; dropping below the tracks creates a new audio track. |
| Finder / Explorer (video / image) | A visual track | Imports the files the same way a grid drop does, then places them. |
| A Session grid cell | A visual track | Drops a copy of that cell's clip — the grid doubles as a palette of prepared looks. |
A ghost of the clip follows the cursor while you drag, snapped to the grid, so you can see where it'll land before you let go. Dropping onto a kind-incompatible track (a video onto an audio track, say) shows an invalid indicator and does nothing.
Default length. Video and audio clips arrive at their intrinsic length, ready to trim. Animations and stills — which have no intrinsic length — arrive at eight grid divisions, or ten seconds when snapping is off. Trim them to taste.
Moving clips
Drag a clip's body to move it in time. The value tooltip reads M:SS.mmm (plus bar.beat when the beat grid is on) so you can place it exactly.
- Drag vertically to move a clip to another track. Kind-compatible tracks highlight; incompatible ones dim.
- Select several clips and drag any one of them to move the whole selection rigidly, keeping their spacing. The move is atomic — tightly packed clips slide past each other as a unit instead of tripping over one another on the way.
- Hold
Altwhile dragging to leave a copy behind — the same duplicate-drag as the grid. Escapecancels a drag in progress.
Slip editing
Cmd+Alt-drag a clip body and the clip stays exactly where it is while the content slides underneath it — a slip edit. The window on the timeline is frozen; you're choosing which part of the video or animation shows through it, with an offset-delta badge tracking how far you've moved.
This is the fix for "the clip is in the right place but the beat drop is half a second late". The modifiers change the cursor as soon as you press them, so you can tell you're about to slip rather than move.
Trimming
Drag a clip's left or right edge to trim it:
- Left edge trims the in-point. For video and audio the content underneath stays put — you're revealing more or less of the source, not sliding it. (Animation envelopes re-normalize to the new length.)
- Right edge trims the out-point, changing the clip's length.
A clip's trimmed length is its duration on the timeline, and fades always stay inside it.
When content is shorter than the clip
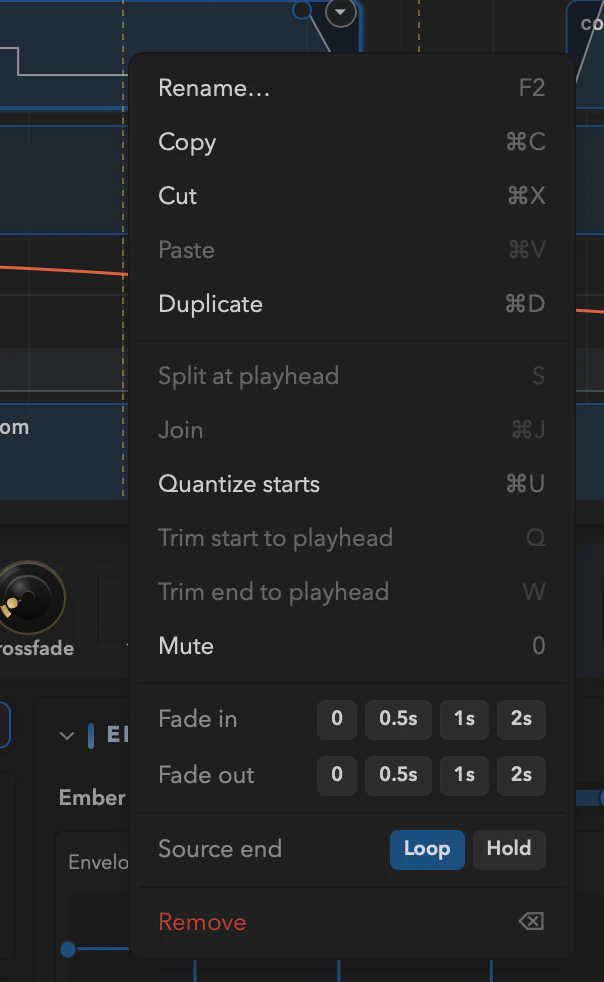
A clip can be longer than the media inside it. Source end behavior — on the right-click menu and in the inspector — decides what happens past the end:
- Loop wraps the content and repeats it for the rest of the clip.
- Hold freezes on the last frame or final state.
Editing clips
| Action | How |
|---|---|
| Split at playhead | Select clip(s) and press S. Both halves keep their content and automation, re-normalized to their new ranges. |
| Join | Cmd+J welds adjacent selected clips back into one. |
| Duplicate in place | Cmd+D drops a copy right after the original. |
| Quantize | Cmd+U pulls the selected clips' starts onto the grid, skipping any that would collide. |
| Trim to playhead | Q trims the start, W trims the end — same result as dragging the edge there, without the aim. |
| Mute | 0 toggles mute on the selection. |
| Rename | F2. |
| Remove | Delete or Backspace. |
| Nudge | ← / → move by one grid step; Shift fine-nudges (a tenth of the grid, minimum 10 ms). |
| Across tracks | ↑ / ↓ move the selection to the track above or below. |
Q and W are the ones to build a habit around. Park the playhead where the music changes, hit W, and the clip ends exactly there — no zooming in to find a 3-pixel edge handle.
Join works on clips with no per-clip envelopes, and on clips whose envelopes are entirely linear or hold segments — the common opacity-ramp and step cases, which recombine exactly. An eased envelope (sine, quad, circ, expo) blocks the join rather than silently reshaping your curve to make the maths work.
A muted clip draws faded with an M badge and goes dark in the actual output, not just the preview. Mute one half of a crossfade and the transition degrades to a plain fade on the surviving clip.
Copy and paste
| Key | Action |
|---|---|
Cmd+C / Cmd+X | Copy / cut the selection |
Cmd+V | Paste at the playhead |
A multi-clip paste lands at the playhead with the relative layout preserved — spacing, track offsets, the shape of the phrase. That makes copy-paste a real compositional tool: build eight bars, copy, move the playhead, paste, vary it.
Pastes are rigid. If any clip in the payload would collide, the whole paste aborts rather than partially landing and leaving you to work out which half made it. Paste a clip whose original track no longer exists and Filament remaps it by layer ID.
Automation-lane points copy and paste too. A generator (LFO) lane refuses a point paste, since it has no points to hold.
While the Arrangement is showing, the native Edit → Cut / Copy / Paste menu items route here — not to the canvas.
Right-click a clip
Rename… (F2), Copy / Cut / Paste / Duplicate, Split at playhead, Join, Quantize starts, Trim start / end to playhead, Mute, Source end, and Remove — each with its key hint spelled out on the right, so the menu teaches you the shortcut you'll use next time.
Fades
Every clip has a fade-in and a fade-out. Select a clip and drag the handles in its top corners to set each fade's length; Alt-click a handle cycles its shape through Linear, Equal-power (the default), and S-curve. A fade dims the content before the layer's own opacity and blend apply, so it reads as the clip easing in and out — not the whole layer changing.
Crossfades are overlaps
There's no separate crossfade object to manage. Drag one clip over another on the same track and the overlap is the crossfade — Filament draws an X-wedge across it and blends the outgoing clip's fade-out into the incoming clip's fade-in (equal-power by default, so perceived brightness holds steady across the transition).

Because the crossfade is positional, it's deterministic: pause mid-crossfade and it freezes, seek into the middle and you land at exactly that mix, export and it renders identically. Overlaps are capped at two clips — drag a third clip toward an existing overlap and it clamps rather than stacking.
Snapping

The toolbar's snap toggle turns snapping on and sets the grid division; switch between a seconds grid and a beat grid (which follows the project BPM) there too. While dragging, a clip snaps to the nearest candidate within a few pixels, and a vertical indicator flashes where it caught. Candidates, in priority order:
playhead → markers → clip edges (on every track) → grid lines
Hold Alt to bypass snapping for a single gesture. Snap settings persist with the project.
Selecting
- Click selects a clip;
ShiftorCmd-click adds or removes from the selection. - Drag across empty space to marquee-select every clip the box touches — including the empty space below the last track, which is usually where your cursor already is.
Cmd+Aselects all clips currently in view.- A press with no drag clears the selection.
A single-clip selection opens that clip in the inspector, where you edit its parameters, effect chain, and per-clip automation — the same panel the grid uses.
Getting around
| Key | Action |
|---|---|
Home / End | The start / the end of the show |
, / . | Previous / next marker |
Alt+← / Alt+→ | Previous / next clip edge |
Z | Zoom to the selection (fit-all with nothing selected) |
Cmd+0 | Fit the whole show |
+ / - | Zoom around the playhead |
Cmd+L | Set the loop region to the selection span |
L | Toggle the loop |
Clip-edge navigation is how you audition a transition: Alt+→ to the edge, Space, listen, Alt+→ again. Cmd+L turns a selection into a loop, which is how you work a section until it's right.
Ruler and transport gestures
- Click the ruler to seek; drag it to scrub. (Video refines to the exact frame when you release; animations and automation are exact at any drag speed.)
- Drag the playhead line in the lane area to scrub too — you don't have to reach up to the ruler mid-edit. Live while you drag, settling on release.
- Drag in the ruler's loop band to create or resize the loop region; double-click the band to toggle it; drag its body to move it.
- Drag a marker flag to move it, double-click to rename, right-click for color or remove.
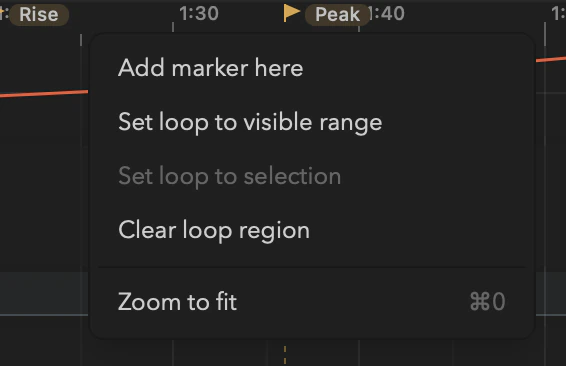
- Right-click the ruler body for Add marker here, Set loop to visible range, Set loop to selection, Clear loop region, and Zoom to fit.
Right-click the empty canvas
Right-click empty lane space, a track, or the background below the tracks for Paste here, Add marker here, Add audio track, a master automation lane, and Select all clips.
Everything on that menu happens at the snapped click time, not at the playhead. Right-click where you want the marker and you get the marker there — no repositioning the playhead first.
Tracks and headers
The track header column down the left edge does more than label rows.
- Drag a header to reorder tracks. A 2 px indicator shows the drop, and the change commits through the layer stack, so the grid agrees. Drops stay inside the same group band. Audio track rows reorder the same way.
M/Sbuttons mute and solo a track. Mute silences that track's content; solo isolates it and dims the rest. Automation lanes on a muted track keep evaluating — muting a track shouldn't freeze the master brightness curve that happens to live under it.- Track mute and solo are arrangement-scoped, independent of the bound layer's own enable toggle. What you mute for an edit doesn't follow you back to the Session grid.
- Drag the divider between the header column and the lanes to resize it (clamped 132–360 px). The width survives a restart.
Right-click a visual track header for Rename…, Duplicate track, Mute, Solo, Collapse / Expand lanes, Move up / down, an Add automation lane target list, and Remove track (confirmed). An audio track header offers rename, mute, solo, move, and remove.
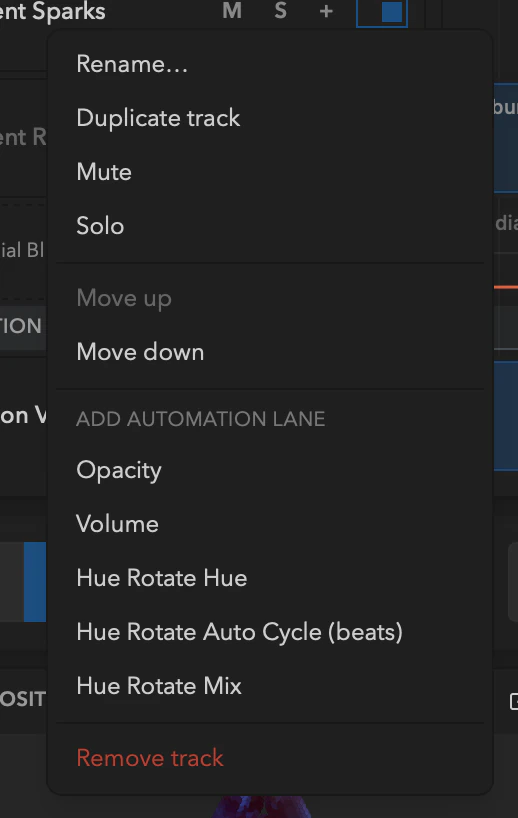
Duplicate track clones the bound layer, its clips, and its lanes with fresh IDs in one atomic step — and one undo removes the whole thing. That's the fast way to build a second, offset copy of a track you've already tuned.
Keyboard
The full list is on the Keyboard Shortcuts page, or Cmd/Ctrl + / in the app. The ones you'll wear out:
| Key | Action |
|---|---|
Space | Play / pause |
Tab | Toggle Session / Arrangement |
S | Split at the playhead |
Q / W | Trim start / end to the playhead |
Cmd+D | Duplicate in place |
Cmd+J / Cmd+U | Join / quantize |
0 | Mute |
Cmd+C / X / V | Copy / cut / paste |
M | Drop or rename a marker at the playhead |
Cmd+Z / Shift+Cmd+Z | Undo / redo |
Every gesture — a drag, a trim, a split, a marquee delete, a fade tweak, a held nudge — is a single history entry, so Cmd+Z walks your edits one clean step at a time. That's the whole reason it's safe to work fast here.
The Timeline
The Timeline is the Player's Arrangement view — a DAW-style workspace where you lay clips, video, and audio on tracks over time and play a composed show back frame-exact, every run.
Automation
Draw automation curves in track lanes, record live knob moves, run LFOs, and travel per-clip envelopes with the clip — FL-style, on almost any parameter.